
TM4C123G LaunchPad Bring-Up: Windows/Keil and Ubuntu/OpenOCD Setup
After completing the first stage of my HC-05 Bluetooth analysis with the Elegoo/Arduino Uno R3, I wanted to move the experiment to a more capable embedded platform: the Texas Instruments TM4C123G LaunchPad. The motivation was not simply to use a different board. The TM4C123G gives me a stronger platform for future communication experiments because it provides a 32-bit ARM Cortex-M4F microcontroller, multiple hardware UART modules, more direct control over interrupts and timers, and a more realistic embedded development workflow than the Arduino environment.
This post documents the initial setup process for the TM4C123G LaunchPad on both Windows and Ubuntu 20.04. The goal was to establish a clean bring-up path that I can repeat later if I need to rebuild the environment. I also wanted to document the challenges I encountered because the setup did not work immediately. The most important lesson from this process was that embedded setup should be treated as a layered system: first confirm the board is physically detected, then confirm the operating system has the correct drivers or permissions, then confirm the development tool can see the debug interface, then build and flash the simplest possible firmware.
The final result was successful. I was able to flash the TivaWare Blinky example from Windows using Keil µVision and from Ubuntu using OpenOCD. This gives me a stable foundation for the next phase of the project: UART testing and eventually HC-05 Bluetooth latency, throughput, and reliability analysis.

Hardware and software context
The board used in this setup is the TM4C123G LaunchPad, commonly referred to as the EK-TM4C123GXL. The onboard microcontroller is the TM4C123GH6PM. Texas Instruments describes the LaunchPad as an evaluation platform for ARM Cortex-M4F-based microcontrollers, and the board includes an onboard In-Circuit Debug Interface, or ICDI, that supports programming and debugging through USB. The official LaunchPad user guide is the most useful hardware reference for understanding the board layout, the debug interface, the virtual COM port, and the onboard RGB LED.
The two host environments were used for different reasons. Windows was used first because Keil µVision and TI’s older Stellaris ICDI support are commonly used with Tiva C examples, and the TivaWare Blinky project already includes Keil project files. Ubuntu was used next because my broader HC-05 experiments and Python measurement scripts are running on Ubuntu, so I eventually need the TM4C123G to be programmable and testable from the same Linux environment.
From an engineering perspective, using both environments was valuable. Windows confirmed that the board, cable, ICDI interface, and TivaWare project were working. Ubuntu then became a separate host-side integration problem. This separation reduced ambiguity. If the board failed on Ubuntu after working on Windows, the likely cause was no longer the board itself but the Linux toolchain, USB permissions, or OpenOCD configuration.
Core bring-up principle: reduce variables one layer at a time
The main mistake I wanted to avoid was jumping directly into the HC-05 experiment before proving that the board was working. The HC-05 experiment has many possible failure points: Bluetooth pairing, UART baud rate, TX/RX wiring, voltage levels, packet parsing, host-side Python code, and the embedded firmware. If I started there, a failure could come from anywhere.
Instead, I treated the setup as a sequence of increasingly specific checks. The first question was whether the computer could physically see the board. The second question was whether the development tool could communicate with the onboard debug interface. The third question was whether a known-good firmware image could be flashed. Only after those layers were confirmed would it make sense to connect the HC-05.
The simplest firmware test was the Blinky example. A blinking onboard LED is not complicated, but that is exactly why it is useful. It proves that the build, flash, reset, and execution pipeline works without requiring external wiring.
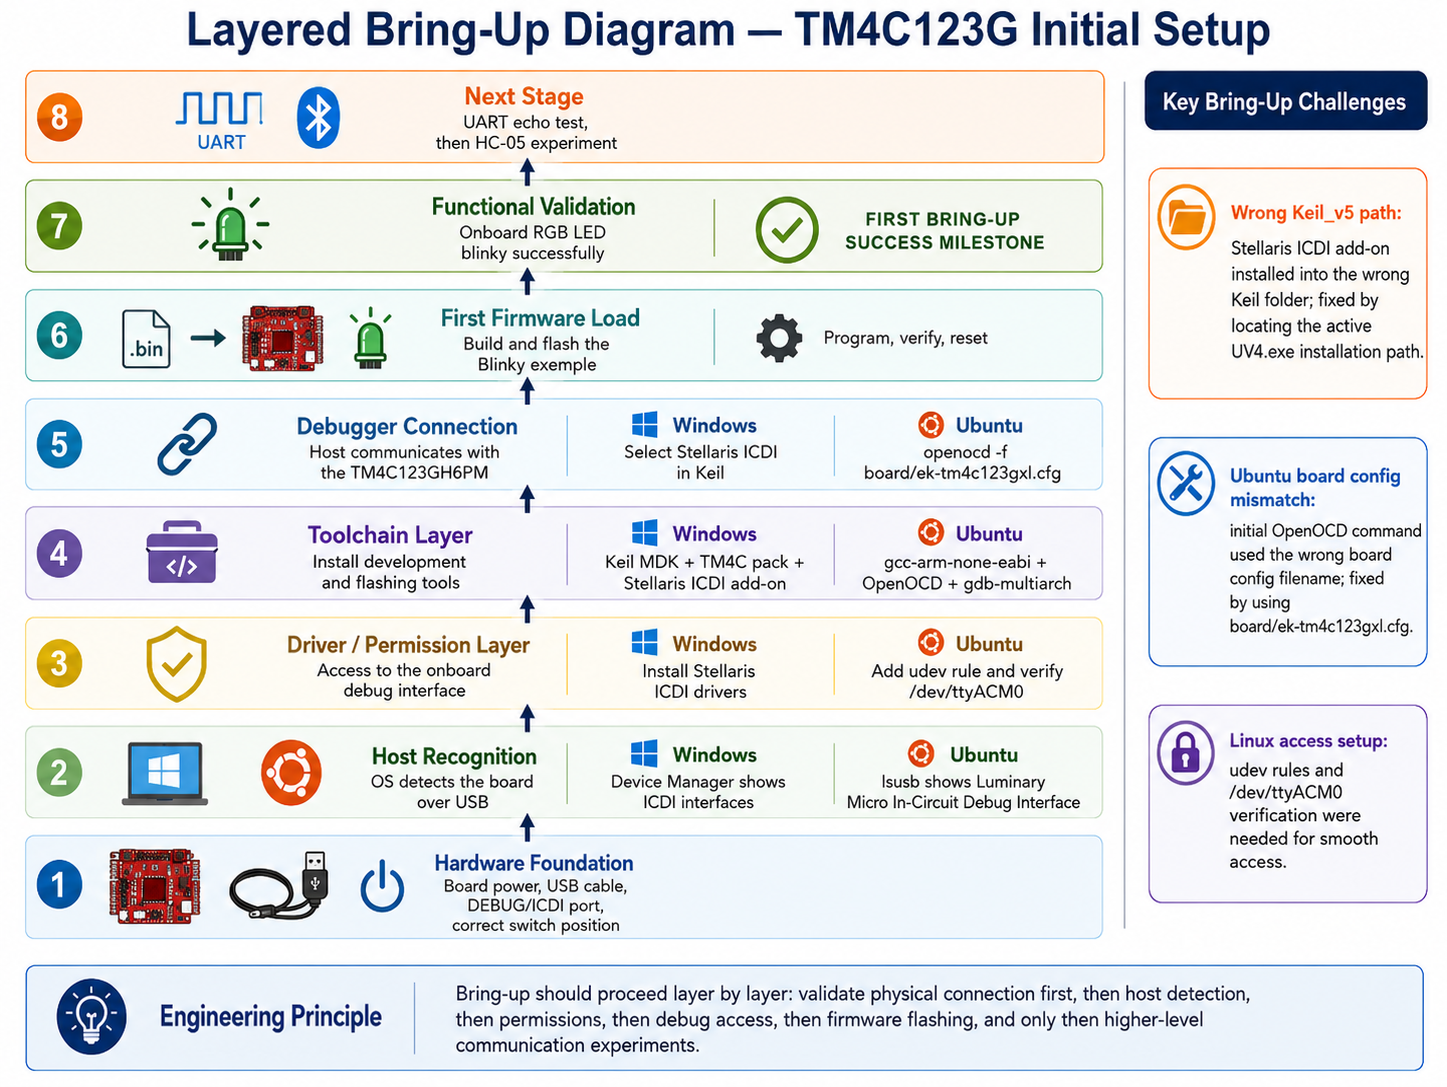
Windows setup with Keil µVision
I started on Windows because Keil provides a familiar IDE-based path for the TivaWare examples. The key pieces required on Windows were Keil µVision, the TM4C device support pack, the Stellaris ICDI Windows drivers, and the Keil Stellaris ICDI add-on.
The first physical setup step was to connect the TM4C123G LaunchPad through the DEBUG/ICDI micro-USB port, not the device USB port. This distinction matters because the debug port is connected to the onboard ICDI interface that Keil uses for programming and debugging. I also made sure that the board power-selection switch was set to the debug side. If the board is connected through the wrong USB port, it may receive power but still not expose the programming/debugging interface to the host.
After connecting the board, I checked Windows Device Manager. At first, the board appeared under unknown or other devices with yellow warning icons for the in-circuit debug interface. This meant Windows could physically detect the board, but it did not yet have the correct drivers installed. That distinction is important: a yellow warning icon is not the same as no device at all. It means the USB enumeration step worked, but the driver layer was incomplete.
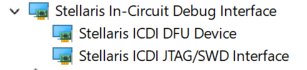
To fix this, I installed the Stellaris ICDI drivers from Texas Instruments. These drivers are needed so Windows can properly expose the ICDI debug interface and the virtual serial port. Once the drivers are installed correctly, Device Manager should show entries related to the Stellaris In-Circuit Debug Interface and a Stellaris Virtual Serial Port. The virtual serial port will become useful later for UART debugging, but for the first setup milestone the critical piece was the debug interface used for flashing.
The next Windows setup step was to make sure Keil had support for the TM4C123GH6PM device. When I first opened the TivaWare Blinky project, Keil reported a device-related issue indicating that it could not find the TM4C123GH6PM. This meant the project referenced a device that Keil did not currently know how to target. The fix was to open Keil’s Pack Installer and install the Keil::TM4C_DFP device family pack. This pack provides device support for the TI Tiva C / TM4C family. After installing it, the TM4C123GH6PM became visible in Keil.
The Blinky project from TivaWare was also an older Keil project. Keil prompted me to migrate the project to the device-pack format. I selected the migration option rather than installing legacy support. This updated the project so that Keil MDK 5 could resolve the target device using the installed device pack.
The most time-consuming Windows issue was not the device pack. It was the missing Stellaris ICDI option under Keil’s Debug settings. At first, Keil showed debug adapters such as ULINK, J-Link, ST-Link, and CMSIS-DAP, but it did not show Stellaris ICDI. Those other adapters are valid for other hardware setups, but they were not the correct choice for this board because I was using the onboard ICDI debugger.
The correct fix was to install the Keil Stellaris ICDI add-on. The problem was that the add-on was initially installing into the wrong Keil_v5 directory. This is a subtle but important issue. A computer can have more than one Keil-related folder, and installing the add-on into a Keil directory that is not the one used by the active UV4.exe will not change the options inside the Keil instance that is actually being launched.
The fix was to locate the real Keil installation path by finding the file location of the Keil µVision shortcut and identifying the active UV4.exe. After installing the Stellaris ICDI add-on into that exact Keil_v5 path, the Stellaris ICDI option appeared under the Debug tab. This was the key turning point on Windows.
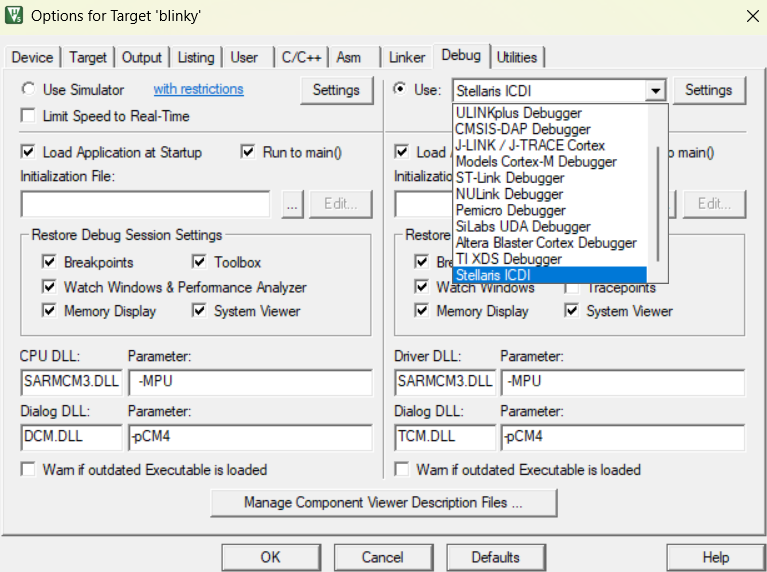
With the correct device and debugger selected, the Windows flashing path was straightforward. In Keil, I opened the TivaWare Blinky project, confirmed that the target device was TM4C123GH6PM, selected Stellaris ICDI under the Debug tab, and confirmed that the Utilities tab was set to use the debug driver for flash programming. Then I built the project and downloaded it to the board. The onboard LED blinked successfully.
The important engineering conclusion from the Windows setup is that Keil requires two separate forms of support: device support and debug adapter support. Installing the TM4C device pack allowed Keil to understand the microcontroller, but it did not automatically add Stellaris ICDI as a debug adapter. The Stellaris ICDI add-on was needed separately, and it had to be installed into the active Keil directory.
Windows setup checklist for future repetition
If I need to repeat the Windows setup in the future, I would use the following sequence. I am keeping this section concise, but each step corresponds to a specific layer in the bring-up pipeline.
- Connect the TM4C123G LaunchPad through the DEBUG/ICDI USB port and set the power switch to DEBUG.
- Open Device Manager and confirm that Windows detects the board.
- Install the TI Stellaris ICDI drivers if Device Manager shows warning icons.
- Install Keil µVision.
- Install the
Keil::TM4C_DFPdevice pack from Keil Pack Installer. - Install the Keil Stellaris ICDI add-on into the same Keil_v5 directory that contains the active
UV4.exe. - Open or migrate the TivaWare Blinky project.
- Select
TM4C123GH6PMas the target device. - Select
Stellaris ICDIunder the Debug tab. - In the Utilities tab, use the debug driver for flash programming.
- Build the project and flash it to the board.
- Press reset if the LED does not begin blinking immediately.
This sequence is useful because it avoids treating Keil as one monolithic setup. The board must be detected by Windows, Keil must know the device, Keil must know the debug adapter, and the project must use the correct flash programming path.
Understanding the build outputs: .axf and .bin
After building the Blinky project in Keil, I had two useful output files: blinky.axf and blinky.bin. The .axf file was larger, around 35 KB, while the .bin file was around 2 KB. This difference is expected.
The .bin file is the raw firmware image. It contains the bytes that need to be placed into the microcontroller’s flash memory. It does not contain symbolic debug information, source-line mappings, or section metadata. Because it is raw, a flashing tool must be told where in memory to place it. For the TM4C123G, that location is the beginning of flash memory, 0x00000000.
The .axf file is an executable/debug image. It can include the program plus symbol information, section information, debug metadata, and address information. This makes it useful for debugging in Keil or with GDB/OpenOCD. The full .axf file size should not be interpreted as the amount of flash consumed by the firmware. When a tool programs the .axf, it reads the loadable sections and writes the relevant parts to flash; it does not simply copy all debug metadata into the microcontroller.
This distinction matters for future embedded analysis because file size is not always the same as memory footprint. For firmware size, the better source is the build report showing code, read-only data, read-write data, and zero-initialized data. The raw binary size is closer to the programmed image, while the .axf is more useful for debugging and symbolic inspection.
Ubuntu setup with OpenOCD
Once the board worked on Windows, I moved back to Ubuntu 20.04. This time, the setup was much easier to reason about because the board had already been proven functional. If Ubuntu failed, the likely causes were Linux USB detection, permissions, or OpenOCD configuration.
The first check was lsusb. Initially, before the Windows success, Ubuntu had not shown the board. After using the same working cable and connecting to the DEBUG/ICDI port, Ubuntu detected the board correctly:
Bus 003 Device 040: ID 1cbe:00fd Luminary Micro Inc. In-Circuit Debug Interface
This was the most important Linux hardware detection milestone. It confirmed that the board was visible to Ubuntu as a USB device with vendor ID 1cbe and product ID 00fd.
I also checked whether the virtual serial device appeared:
ls /dev/ttyACM* /dev/ttyUSB* 2>/dev/null
The result was:
/dev/ttyACM0
This confirmed that the board exposed a virtual serial device through the ICDI interface. This is not required for flashing through OpenOCD, but it is useful for later UART debugging.
The next step was to install the Linux development tools:
sudo apt update
sudo apt install -y gcc-arm-none-eabi gdb-multiarch openocd make
Each tool has a specific role. gcc-arm-none-eabi is the cross-compiler for ARM Cortex-M targets. gdb-multiarch provides a debugger that can understand ARM targets. openocd communicates with the onboard ICDI debugger and can flash the microcontroller. make supports building projects from source. For the immediate milestone, OpenOCD was the most important tool because I wanted to flash the already-built Blinky binary.
I also added a udev rule so that OpenOCD and serial tools could access the board without requiring root every time. The rule was based on the USB IDs reported by lsusb:
sudo vim /etc/udev/rules.d/99-tiva.rules
The rule file contained:
SUBSYSTEM=="usb", ATTR{idVendor}=="1cbe", ATTR{idProduct}=="00fd", MODE="0666", TAG+="uaccess"
KERNEL=="ttyACM*", ATTRS{idVendor}=="1cbe", ATTRS{idProduct}=="00fd", MODE="0666", GROUP="dialout", TAG+="uaccess"
Then I reloaded the rules:
sudo udevadm control --reload-rules
sudo udevadm trigger
One small correction mattered here. I initially tried:
sudo udevadm --reload-rules
but Ubuntu reported that the option was unrecognized. The correct form is:
sudo udevadm control --reload-rules
This is a good reminder that even setup commands should be treated experimentally: run the command, read the error, identify whether the error is conceptual or syntactic, then correct the command.
OpenOCD configuration issue
After confirming that Ubuntu could see the board, I tried to connect with OpenOCD using this command:
openocd -f board/ti_ek-tm4c123gxl.cfg
This failed with:
Error: Can't find board/ti_ek-tm4c123gxl.cfg
This was not a board problem. It was a configuration file name problem. The installed OpenOCD version had the TM4C123G LaunchPad configuration file, but under a different name. I searched the OpenOCD scripts directory:
ls /usr/share/openocd/scripts/board | grep -i -E "tm4c|lm4f|stellaris|ek"
The correct file was:
ek-tm4c123gxl.cfg
So the correct OpenOCD command was:
openocd -f board/ek-tm4c123gxl.cfg
This succeeded and produced the key confirmation:
Info : ICDI Firmware version: 9270
Info : tm4c123gh6pm.cpu: hardware has 6 breakpoints, 4 watchpoints
This output confirmed that OpenOCD could communicate through the onboard ICDI debugger and correctly identify the TM4C123GH6PM CPU. At this point, Ubuntu was no longer just detecting the USB device; it was communicating with the microcontroller through the debug interface.

Flashing the Blinky binary from Ubuntu
After OpenOCD connected successfully, the next goal was to flash the same Blinky firmware from Ubuntu. Since I already had blinky.bin from the Keil build on Windows, I copied it into a Linux project directory:
/home/j4505/Documents/projects/microcontroller-projects/tiva_test/blinky.bin
Then I flashed it with OpenOCD:
openocd -f board/ek-tm4c123gxl.cfg \
  -c "program /home/j4505/Documents/projects/microcontroller-projects/tiva_test/blinky.bin 0x00000000 verify reset exit"
The address 0x00000000 is needed because blinky.bin is a raw binary file. Unlike an .axf or .elf file, it does not contain section/address information, so OpenOCD must be told where to place it in flash.
The flash operation succeeded. The most important part of the output was:
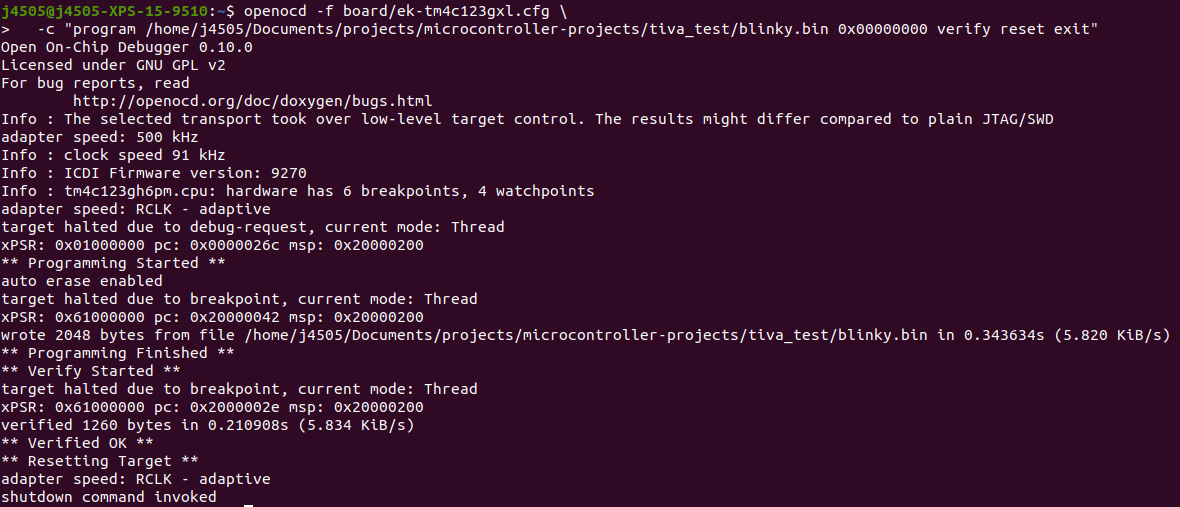
The Verified OK line is the key confirmation. It means OpenOCD read back the programmed memory and confirmed that it matched the firmware image. At that point, the Ubuntu flashing path was working.
This completed the Linux bring-up chain:
Ubuntu → USB detection → udev permissions → OpenOCD → Stellaris ICDI → TM4C123G flash → Blinky runs
Ubuntu setup checklist for future repetition
If I need to repeat the Ubuntu setup, I would use this sequence:
- Use the same known-good USB cable and connect to the DEBUG/ICDI port.
- Confirm USB detection with
lsusband look for1cbe:00fd Luminary Micro Inc. In-Circuit Debug Interface. - Confirm the virtual serial device with
ls /dev/ttyACM* /dev/ttyUSB* 2>/dev/null. - Install the required tools with
sudo apt install -y gcc-arm-none-eabi gdb-multiarch openocd make. - Add a udev rule for vendor ID
1cbeand product ID00fd. - Reload udev rules with
sudo udevadm control --reload-rulesandsudo udevadm trigger. - Run
openocd -f board/ek-tm4c123gxl.cfgto test the debug connection. - Flash a known-good firmware image using OpenOCD.
- Verify that OpenOCD reports
Verified OK. - Press the board reset button if the application does not start immediately.
This sequence is now repeatable because the earlier ambiguity has been removed. The correct OpenOCD board file on this Ubuntu installation is board/ek-tm4c123gxl.cfg, not board/ti_ek-tm4c123gxl.cfg.
Main challenges and what they taught me
The first challenge was basic board detection. At one stage, Ubuntu did not show the board in lsusb. This forced me to check the most basic assumptions: the USB cable, the port on the board, and the power/debug switch. In embedded work, a board that lights up is not necessarily a board that is connected for data. A charge-only cable can power the board while still preventing USB enumeration.
The second challenge was Windows driver installation. Device Manager initially showed the board with warning icons. This meant the USB connection was alive, but the Windows driver layer was incomplete. Installing the Stellaris ICDI drivers resolved that layer.
The third challenge was Keil device support. Keil could not initially resolve the TM4C123GH6PM device. Installing the Keil::TM4C_DFP device pack fixed the target-device layer. This taught me to distinguish between “the IDE is installed” and “the IDE knows this specific microcontroller family.”
The fourth and most subtle Windows challenge was the missing Stellaris ICDI debugger option in Keil. The Keil Stellaris ICDI add-on had been installed, but it was installed into the wrong Keil_v5 directory. The correct fix was to locate the active UV4.exe and install the add-on into that exact Keil path. This is a good example of a path-consistency problem: the correct software existed, but Keil was not loading it because it was not installed into the active toolchain directory.
The fifth challenge was OpenOCD configuration naming. I initially used the wrong board configuration filename. The file board/ti_ek-tm4c123gxl.cfg did not exist on my Ubuntu installation, while board/ek-tm4c123gxl.cfg did. Searching /usr/share/openocd/scripts/board revealed the correct filename. This is a reminder that examples from different OpenOCD versions may use slightly different configuration names.
The sixth challenge was understanding build artifacts. Seeing blinky.axf at around 35 KB and blinky.bin at around 2 KB could be confusing at first. The important distinction is that .bin is the raw firmware image while .axf includes executable/debug metadata. For flashing the raw binary, I had to explicitly provide the flash address. For debugging, .axf is more informative.
Engineering takeaways before moving to HC-05
This setup process reinforced a central engineering principle: before analyzing a communication module like the HC-05, the base platform must be stable. I now have evidence that the TM4C123G board can be programmed from both Windows and Ubuntu. This means future HC-05 failures are less likely to come from the board setup itself and more likely to come from UART configuration, wiring, baud rate, Bluetooth pairing, or experiment code.
The setup also clarified the role of each development environment. Windows with Keil is useful for opening and building the original TivaWare examples. Ubuntu with OpenOCD is useful for command-line flashing and integration with the Python-based measurement workflow. Both paths are valuable, but for the actual HC-05 performance experiments, Ubuntu will likely be the main host environment because it is where the existing Bluetooth/serial scripts and data collection workflow already live.
The next step is not yet the full HC-05 benchmark. The next step should be a simple UART echo test on the TM4C123G. First, I will use a polling UART echo test to confirm that the board can receive and transmit bytes reliably. After that, I can move to an interrupt-based UART design for more realistic latency, throughput, and jitter analysis.
In other words, this bring-up stage established the foundation. The next stage will test the communication path.
Commands worth keeping
These are the specific commands from the successful Ubuntu setup that I want to preserve for future use.
Check whether Ubuntu detects the board:
lsusb
Expected relevant output:
ID 1cbe:00fd Luminary Micro Inc. In-Circuit Debug Interface
Check for the virtual serial port:
ls /dev/ttyACM* /dev/ttyUSB* 2>/dev/null
Expected output:
/dev/ttyACM0
Reload udev rules:
sudo udevadm control --reload-rules
sudo udevadm trigger
Test OpenOCD connection:
openocd -f board/ek-tm4c123gxl.cfg
Flash the raw binary:
openocd -f board/ek-tm4c123gxl.cfg \
  -c "program /home/j4505/Documents/projects/microcontroller-projects/tiva_test/blinky.bin 0x00000000 verify reset exit"
Optional flash command for the .axf file:
openocd -f board/ek-tm4c123gxl.cfg \
  -c "program /home/j4505/Documents/projects/microcontroller-projects/tiva_test/blinky.axf verify reset exit"
References and useful resources
- Texas Instruments TM4C123G LaunchPad Evaluation Kit User Guide
- Texas Instruments TM4C123GH6PM Microcontroller Datasheet
- Texas Instruments Stellaris ICDI Drivers
- Texas Instruments TivaWare for C Series
- Keil TM4C Device Family Pack
- OpenOCD Flash Programming Documentation
- OpenOCD EK-TM4C123GXL board configuration example